NOTE: Google Cloud Platform connections are only available on Premium accounts.
To add a Google Cloud Platform Connection, go to the Connections page which is accessible via
Menu → Connected Data → Connections. You must be an Administrator-level user to see this option.

- Click the ADD CONNECTION button on the top right of the page to add a new connection. This will bring up a list of connections from which you can choose.

- Click on Google Cloud Platform.
- Add your Account Key File to be uploaded by clicking on the Select New button and navigating to the file location.
- Add the Service Account Email and Password to be used to authenticate the Service Account Key File.
- Click the SAVE button on the top right of the page to store your configuration.
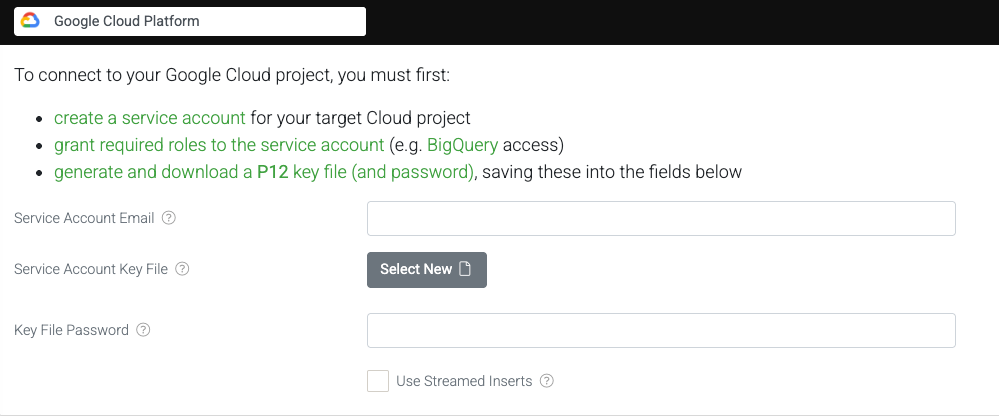
Service Account Email
The Google-provided email address of the Cloud service account you’ve created.
Should end in ‘iam.gserviceaccount.com’
Service Account Key File
The .p12 certificate file you have downloaded for your Google Cloud service account
Key File Password
Password for your service account’s .p12 key file – this would have been displayed by Google at the time of downloading the file
NOTE: You need to create a Google Service Account in GCP before adding the Google Cloud Platform Connection.
Creating a service account
- In the top-left corner of the GCP console, click Menu
 .
. - Click IAM & Admin
 Service accounts.
 - Click Create Service Account and in the Service account name field, enter a name for the service account.
- (Optional) Enter a description of the service account.
- Click Create.
- Assign the desired roles to the new account.
- Click Continue
 Create Key.
 - Ensure the key type is set to P12 and click Create.
You'll see a message that the service account P12 file has been downloaded to your computer.
Take note of the File Password that's linked to the generated P12 file. - Click Close
 Done.
Done. - Click Save.